Tuesday, 27 August 2013

DIY Baby Book Crate

A friend of mine is mega preggers with her first baby. His name is Oliver and he will grace us with his presence very soon. She is a pretty amazing woman and she is going to be a spectacular Momma Bear.

I was  trying to figure out what to get for the little guy, and since she has Toys R Us rage burning deep inside of her - she didn't have a typical baby registry. So I decided instead to make Oliver a little crate for books and paint his name on it.


I fought the temptation to fill the crate with the Twilight books... I will probably wait to Ollie is older and will appreciate the literacy masterpiece that is the Twilight saga. (Please read the previous sentence with a sarcastic tone while at the same time accepting the fact that I have indeed read the Twilight series... now try not to judge).


I made the base and two sides of the crate with a 1x8 knotty pine board. I used a 1x3 for the pieces along the front and back.
 

I know what you are thinking.... and yes I always wear my Michael Kors watch while working with tools, I feel like it gives a good balance to the paint splattered baseball t-shirt. Sometimes you need a little bling to class up the garage.

(Side Note: The watch was a gift from a fabulous and amazing friend and I try not to take it off because I love it so much - and I am afraid that I will lose it... because that would not be an unusual thing for me)


We sanded down all of the boards so that the edges and corners were smooth. (Not exactly a rocket-science idea since it is for a baby... but I still thought I should mention it)


Once all the pieces were ready to go I measured out the holes for the side handles. I bought the handles in the hardware section at Home Depot and the screws they came with were the right depth for my board. I pre-drilled the holes and then assembled the rest of the box.


I gave it two coats of Winwax Special Walnut and once it was dried I added the handles and got ready to paint.


I printed 'OLIVER' off the computer and coloured in the back of the letters with a pencil. Then I laid the stencil along the front 1x3 and drew around the outline of the letters with a pen. This transferred the pencil from the back of the paper onto the board. And Viola! I had an outline to paint.


I did two coats of the paint and let it dry over night. In the morning I sanded over the name very lightly with a 320 grit sandpaper. It just gave it a bit more worn look which I liked.

I hope Oliver and his Momma like it!

xo B

Tuesday, 13 August 2013

Hammering away at things.... literally

I am the middle child in a family with three girls. So I had the joy (and occasional misery) of growing up with two sisters. My mom used to say I was the icing in the middle of the Oreo cookie - but I think she just said this as a way to combat my Middle Child Syndrome - all you middle kids out there totally know what I am talking about.

My older sister lives in Toronto, but my little sister lives near me. She is a peach and a total looker.

Photo: Laura Kelly Photography

Told you so.

Anyways, she is moving to a new apartment at the end of the month and I wanted to make her something for her new place. I had done some nail & yarn art on the seating chart for our wedding and I was looking for a chance to try some more.

 
Photo: Laura Kelly Photography


The seating chart was not small (it was 4 feet x 2 feet - and I almost dropped it on my foot twice). She wanted something to hang over her bed, so used the same building design and shrunk it down a little bit.

Instead of using a wood-colour stain like I did on the seating chart I decided instead to try out a new grey stain I found. Once it was built I took it to the garage and gave it one coat of the Winwax stain in Classic Grey.


I wasn't sure how the stain would absorb, so I only left it on for about 8 minutes. When I wiped it off it was not dark enough (and some of the boards had a red hue to them).

We did a second coat of the stain and then started on the nail design.


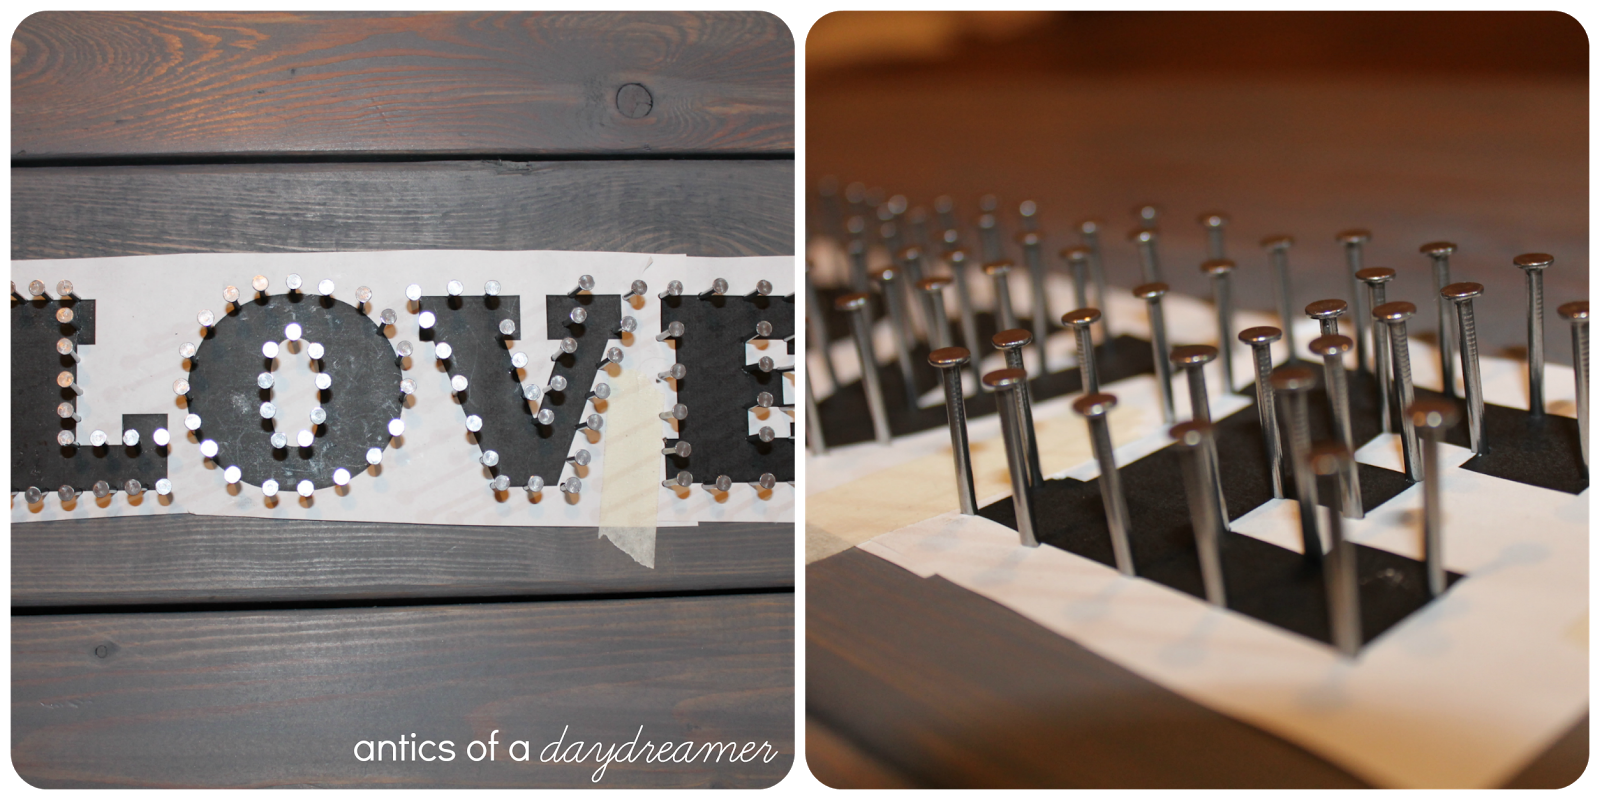
For the design I originally wanted to do the letters LOVE, but as I was making my stencil I thought that was a little too boring. So I decided to put the word LOVE inside a heart (not exactly a wild choice... but a little less boring I think). The plan was the wrap the yarn between the heart and the letters and leave the inside of the letters just the wood. I'm not sure if that explanation makes any sense.... when I tried to explain it the Mr he looked at me like I had just eaten a container of play-doh. Luckily for me, a picture is worth a thousand words.


I printed off the word love in the font and size that I wanted. I didn't want it centred in the heart, so it is off a bit to the right side of the board. Finding the right spacing for the nails was hard and because the letters were not huge and there were some places where I had to space them a little differently. I really do love symmetry... but sometimes you just have to go with what works.


Side Note: this may not have been a good project to work on with a glass of wine. No one was injured, but wine was spilt... and that may actually have be worse.


I had to change the shape of the letters a little as I went along. I used smaller nails on the seating chart, so I had to adjust my spacing to make room for the large nail heads.


Once I finished the letters I pulled off the paper stencil and laid out my heart stencil. I had the cut out the middle of the heart so that I could lay it over the LOVE nails.

Side note: I realize it looks like I drew the heart stencil drunk, but I promise it really was symmetrical - it was just the inside part that I cut sloppy. Notice that I am not saying I wasn't drunk... rather that it was symmetrical and my sobriety wouldn't have made a difference. *wink


I nailed around the outside of the heart stencil and then once i gained feeling back in my arm I took off the paper. Now it is ready for the yarn.


I must admit when I did the yarn part of the seating chart there was a lot of swearing. My little sister was actually at my house when I was working on it and witnessed a lot of profanity... she thought it was hilarious and I could hear her laughing upstairs while I hollered the F* word in the basement.

Luckily this time around went much smoother. As smooth as wrapping yarn around a billion nails could go I guess.

Side note: I took the above and below pics in different rooms and with different camera setting... hence the wood looks really different. In real life it is actually the grey colour below. I just didn't want you to think that this project is some kind of a photoshop scam... although that would be pretty impressive.


xo B

Thursday, 8 August 2013

Who wants to have a dinner party?

We loved our old apartment because of its location and fabulously giant balcony, but inside it was a little on the small side. It had a galley kitchen and practically no where to put a normal sized dining table. (For those who don't know... I teeter on the verge of being a giant. Not so much so that I'm searching for some magic beans in order to make myself a home up in the sky.... but small spaces just contribute to my way-too-gangley-limbs-complex. Thankfully the Mr is no shorty himself so we standing next to each other we just look normal).

hmmm... I got off topic a bit there... back to the dining table. My solution to the small problem was obviously Kijiji (this will be an ongoing theme around here). I found a great bar height table with 4 swivelling stools. It was a great set and fit half-decently in the small corner near the kitchen.

When we moved to our new house I was determined to get a big table (and be able to flail my arms around without hitting a wall). I pictured hosting fabulously elaborate dinner parties with well coordinated table linens and scented candles... although that is pretty far from the reality of my life or rather the level of classiness of my friends. But either way, that was my mission.

So, I did exactly what you would guess... I went on Kijiji yet again. Try to contain your shock and amazement please.

I found an awesome table that had a fabulous wood grain and great legs (I believe I mentioned this earlier, but when it comes to furniture I love great legs). The table came with 6 chairs that gave me little inspiration. So, I sold the 6 chairs and found another set of 4 that worked perfectly. Now obviously I couldn't host a dinner party with only 4 chairs, so I continued to hunt until I found another two chairs that had a similar shape that fit my vision.


We were a little overly ambitious and sold our bar height table before we even started on the new set. So, we had no dining table for a little while. And by a 'little while' clearly I mean almost 2 months.


We wanted the table top to have a bit of a rustic look to it. So we decided to sand off the old stain and top coat unevenly. The hope was that with some of the old stain still on the wood it would absorb the new stain differently across the top. Luckily for me, this little experiment worked out amazingly.


We decided to paint the legs of the table and the chairs. We found a sale on paint at Lowes and picked out a great off white colour. We had never used Para paint and choosing it for this project will forever be one my life's greatest regrets. Yes, you read that right. I hate Para paint. It was the worst paint I have ever worked with. It was sticky, tacky and left terrible brush strokes. It seriously felt like painting with Alymers glue. After doing one coat of primer and one coat of the Para paint I threw a temper tantrum and refused to paint with it anymore. We ended up having to re-sand some of the chairs and buy a whole new can of paint to start over with.

Can you tell that I am still bitter about this? Because I totally am.

For round 2 we decided to go with CIL Smart Melamine Finish in Bone Folder. It turned out nicely, although it would have been so much better if we had started with the CIL paint. We never quite got rid of all of the mess left behind by the Paint-that-shall-not-be-named, but we are happy with the results.


Anyways.... moving on from that leaning lesson. Next came reupholstering the chairs. The original cushions on all of the chairs were gross. And when I say gross I mean NASTY!


After much debate and discussion, the Mr finally gave in to me agreed to the fun fabric I had chosen for our new cushions.


We bought new foam for the seat and used the old cushions to trace out the shape. We tried a combination of a saw, exact-o knife, and bread knife to cut out the new cushions. Oddly enough, bread knife was the best choice. We used the original plywood bases for the new seats because they were still in good shape. For each cushion we laid the new foam on the wood and then covered it with new batting (we got a random bag of it from Fabric Land for about $20 and it was the perfect amount for all 6 cushions).


Once the batting was stapled down we cut the fabric using the old material for a stencil. Upholstering is certainly a two person job, but it went pretty quickly once we got the hang of it. Neither of us had reupholstered before, but we were pretty happy with the results and no one got a staple in the hand.

Side Note: Is it called upholstering or reupholstering? I used both works in the above paragraph in the hopes that when I read it back to myself if would become obvious which one sounded correct. But that is not happening and now I am just more confused. I think I will continue to use them interchangeably until I know for sure - if that fails maybe I will just make up a word... perhaps I will call it Fabricking. Don't judge.


We are super happy with how it all turned out in the end. Its the perfect size for our dining area.


You can see two of the different chairs side by side. I love that they have a similar shape but are not identical.


And maybe we should wrap this up with a little dining room Before (with the old owners furniture) and the After (with our dinner-party-ready dining table)


xo B

Saturday, 27 July 2013

The Desk that started it all...


So I should probably first admit that I love Kijiji. I firmly believe it is a healthy kind of love... its not like I think Kijiji loves me back or anything. Anyways, finding a great deal on a fabulous Kijiji item totally makes my day.

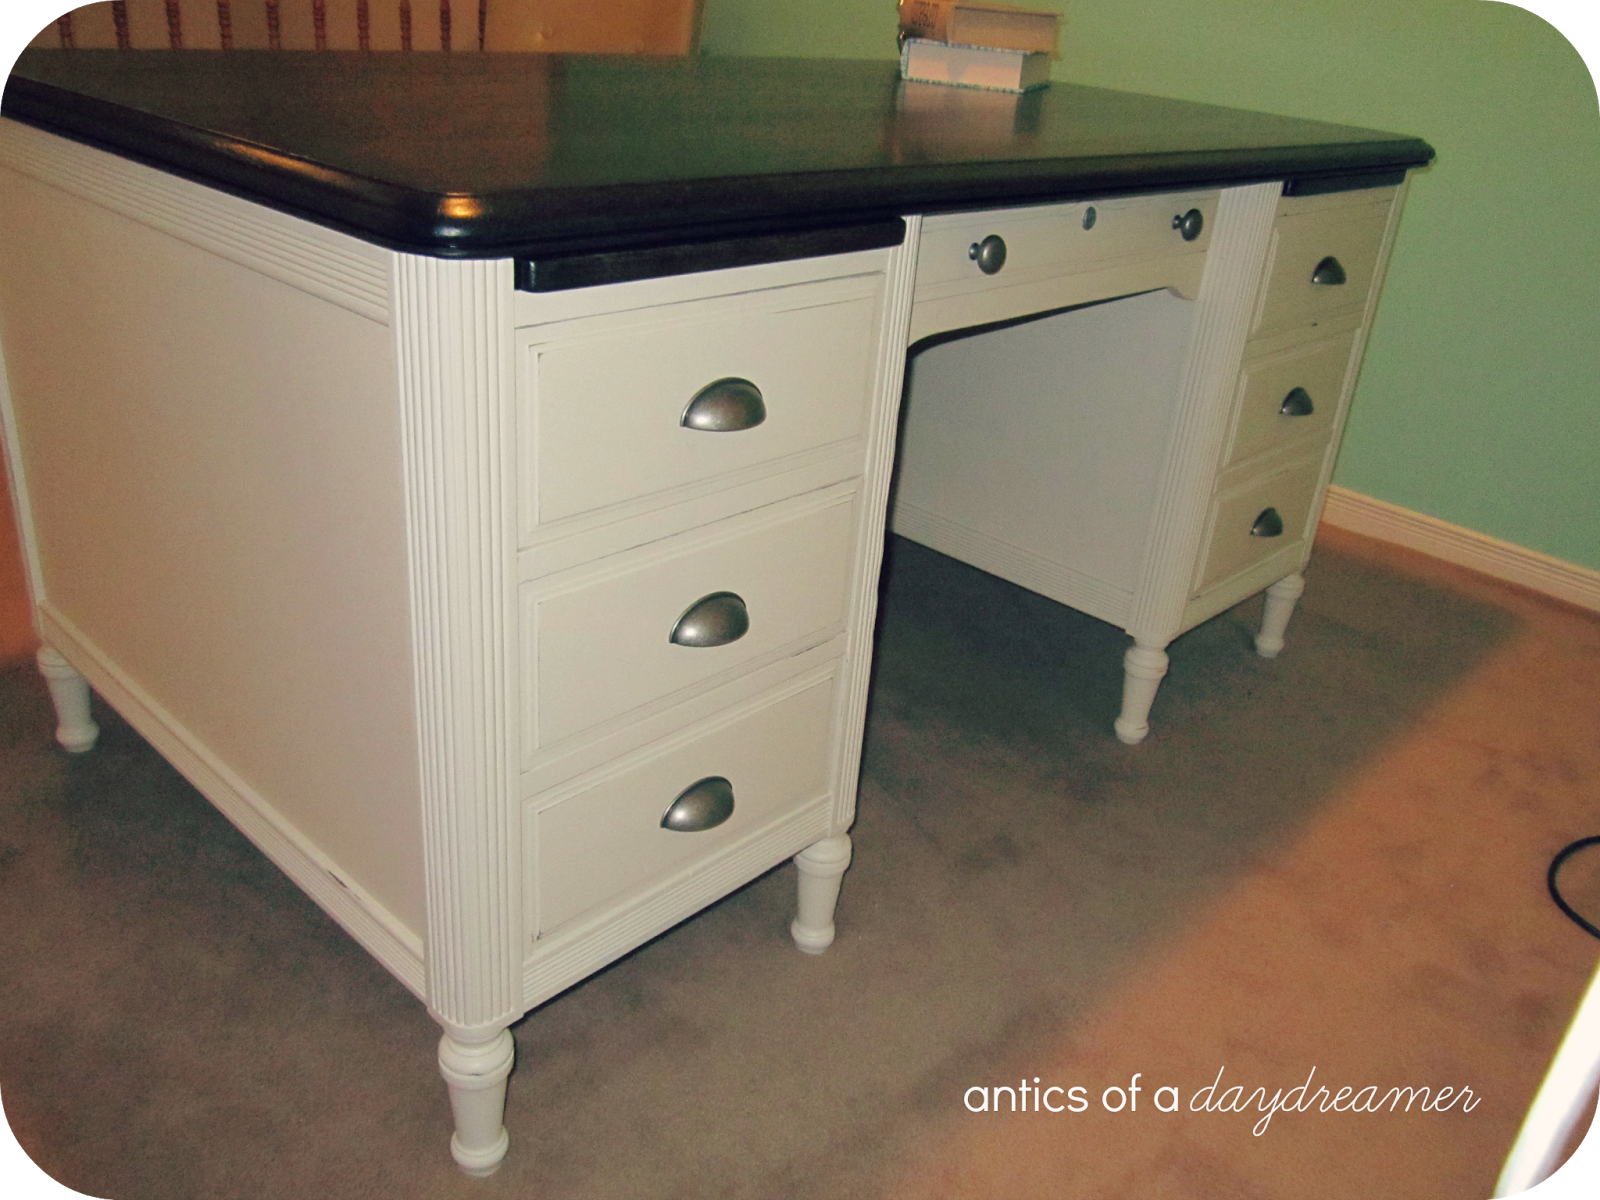
One day cruising for deals I found the most amazing desk. It had certainly seen betters days - its brown coat of paint was worn, chipped and well, ugly. But the desk had amazing character and great legs (when it comes to furniture I am definitely a legs girl). And here is the best news... is was $35. I should probably mention that this wasn't any plain desk, this was a solid wood antique teachers desk. It weighed about 864lbs (rough guess) and i wanted it so bad.

Lucky for me, my Fiance and I had just purchased our first home and it featured... drum roll please... a garage for fun projects like this desk (The Mr honestly though we would be parking the car it in... silly man).

I will admit that it took us a bit to get going on the desk project. Our loft had a dinky ikea desk sitting in the middle of it for about 3 months. I have nothing against ikea, but I knew there was a real beauty of a desk just waiting to command the space.... so my ikea table just looked sad.

But once we got going it wasn't too long before we had this beauty ready to go.


The top of the desk is probably my favorite part. It took a ton of elbow grease and a borrowed palm sander (thanks dad) to get it down to the beautiful wood grain. We decided to go with a dark ebony stain and it turned out beautiful.

The desk has slide out typewriter tables which we also got down to the original wood and used the same dark stain.

The rest of the desk we decided to paint. We choose Antique White by Behr and it is perfect.


We sanded down the some of the corners and edges to give it some old character back again. It took two strong men and one amazing supervisor (yours truly) to get it up the stairs and into the loft.


I really wish that I have some before pictures so you could see how far this girl has come. But trust me when I say she was a sad excuse for a desk before we got our hands on her. Now, having said that, I am starting to consider re-decorating our loft and I'm not sure she fits into my new vision (*tear). Not sure what I will do with her... maybe a Kijiji ad is in my near future.

xo B